
Chat Session 2.
DV390 Blue Mountains in Watercolour
Hi again, this is the second WIP (work in progress) as a blog today, titled- Blue Mountains with code DV390. It is so much fun for me to create my paintings, and time just flies by. This is an older one that I still have available for sale, and still love. Lets hope that I don’t stuff it up, chuckle.
These WIP’s are often used to help people to learn how to paint, but in this instance I am using them to give you, (as a potential or current collector of my work) an insight into the amount of effort that goes into my paintings.
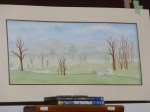
The first photo shows the first washes, that went on. This was after planning and drawing up the scene as I wanted it, and also using a masking fluid to protect the areas that I don’t want to paint over immediately.
The planning and drawing up stages of a painting, can in themselves take a very long time. This partly depends on the subject, the content (lots of detail or minimal detail) required before starting to paint, and the degree of perspective needed, if they are not correct at the beginning, either everything will just look wrong, (in other words a total disaster) or it can make it a lot harder to work on.
Masking fluid is exactly as it sounds, it is a latex film that goes on wet and dries creating a protective film that is gently rubbed off at the required stage of painting. Washes, are also as they sound, they are rather wet, and allow me to see the layout more easily before progressing to each section building up the colour to the intensity that I want it.
The colour intensity, depth, or tone, depends on how much paint and how much water is added to the paint. I decided to keep the sky light as well as the Blue Mountains as they are quite a long way away from the foreground or front of the scene. It helps create depth, giving the allusion of certain things being in the distance or a 3D effect.
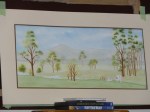
I move forward selecting the colour and tone or intensity as I go. When you look at this stage you can already see the difference in the location of the paddocks. Then came the beginning of the stand of trees, trunks first. Set on the right hand side they are very tall slender gums. from memory there were 9 rows that all had to be painted in order to make sure that the ones located at the back, looked like they were at the back, I made it easier for myself by adding the faintest of pencil numbers near each one across the whole scene. There were some trees that were on the same plane (or level) in other areas of the painting also.
So all I did was paint once on the furthest tree, then paint all trees in front of it a second time. I then eliminated the second furthest tree from being painted, and again painted the remaining ones. I keep removing the next furthest tree/trees so that as I came forward the close trees became slightly more intense or darker/brighter in colour.
Once all the tree trunks were painted I went back over the whole piece, to make sure that the overall depth of colour change was good, and not too intense at the very front. I have also lightly put in the beginning of foliage on some of the furthest trees away, lightly painted the stream in, and put the first wash on the cows.
At each stage, or end of the days work I put a mount around it, set it up on my sideboard cabinet, where I can see it from my lounge room chair. I can look at it from time to time when I am sitting there, and come back with fresh eyes to see if there are any errors to be attended to. Having the mount on lets me get an idea of where to place it when finished, as well as checking the balance of the whole piece. It just makes life easier to check everything as I go along. A mount is the white board that surrounds the whole painting. (It is rather important to have a mount on once your art is framed, as it keeps the painting from resting against the glass, which may cause it to stick and cause potential damage over time.)
Now the trees begin in earnest, having rubbed out the numbers from earlier, I follow the same method of moving from the background to the foreground and adjusting the paint colour and, or tone as I go. I also change some of the greens completely allowing for different types of trees in other parts of the painting. I mix a lot of my own colours and do a fair bit of wet in wet work. In other words I first put down water only where I want to paint, so that the paper is just damp, than add my paint to that, sometimes allowing it to move where it wants to, other times controlling where it goes. Once each layer of foliage is dry I can then add the next. Placement will depend on the time of day depicted, in this case it is a nice bright day with the sun still quite high in the sky so the shadows will be quite short.
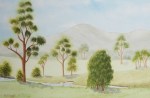
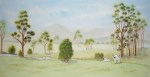
The next two photos are closeups. First the left side then the right, so you can see a bit more of the detail that I have previously added. For example you can see the little creek much better on the left side and also the way the trees gradually fade into the distance.
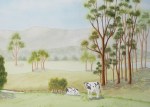
On the right hand side there are a couple of very small young trees just behind the cows, and you can tell that the ground level changes behind the cows. This is where the creek is tucked down out of sight.Then the bank rises on the other side going up to the stand of gum trees. Notice how the trees here also get lighter and a bit blurry as they go into the distance. There is also a large paddock in the middle ground that goes across the whole scene, with another just across the creek, all this helps to give you that feeling of the mountains being far away, which of coarse they are.
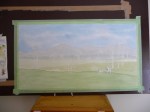
Almost done now, with another day set aside to check again, for potential errors, or, decide if I need to add anything further into the scene. I really like what I see, and am quite proud of this large painting, at 35cm height and 65cm wide, it was at the time of painting the largest work I had done. The following two photos show you the whole painting completed. I decided to add the framed one so you can see how much better it looks when framed. This is the same with any art. This is just an example though, you could put any frame on it that you prefer.
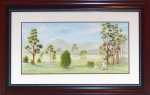
I do apologize for the out of focus framed photo. If you are interested in this one please use the contact form on my web page to get in touch and include this code- DV390, as well as letting me know that you saw it on my blog.
Thank you for joining me here at Dianne Vagg Artist, Chat Session, WIP Blue Mountains.

